After years of touch typing using everyone’s favourite 19th century keyboard layout (QWERTY), I seem to have capped out my typing speed abilities at about 80-85 words-per-minute (WPM).
This isn’t too bad for my needs as a programmer, but I was curious about whether there were any other ways that could help me improve. So, I did a bit of research on other potential layout options like Dvorak, Colemak, and Workman, all of which purport to increase the speed and efficiency of your typing, as well as cut down the travel distance of your fingers, hence reducing the strain on your hands and wrists.
I cannot vouch personally for any of their claims: I did not find the time-and-effort investment in learning one of those layouts, versus the potential benefits, particularly appealing. So, I gave up and just carried on my merry 80 WPM-way.
That is, until a visit to the Open Steno Project put stenography on my radar as an actual viable choice to potentially supercharge my WPM rate. As of this writing, I have just started learning, so I have no idea if I actually will improve, or whether I will continue down the steno path in the future.
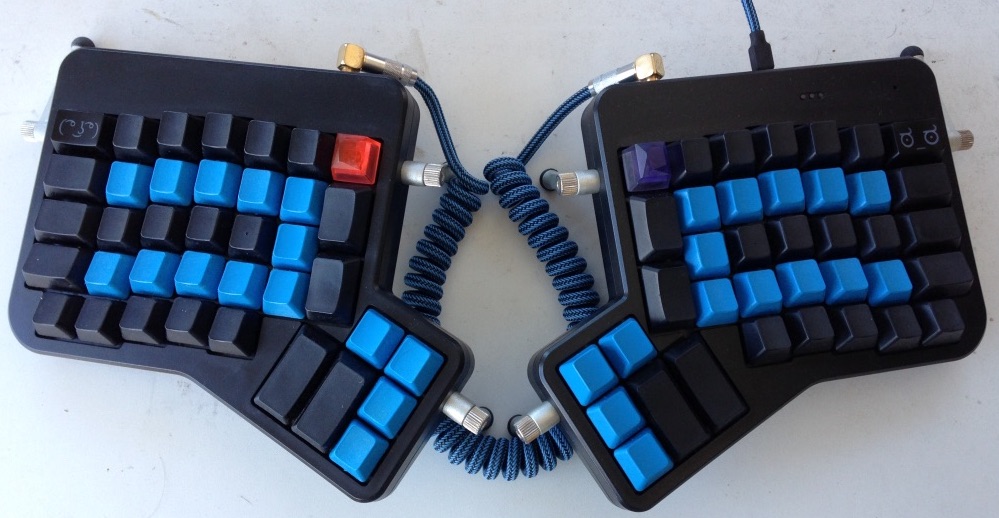
However, just getting my Ergodox set up for stenography was quite an exercise in configuration, so that will be the focus for the remainder of this blog post, in hopes that it will help get the Ergodox-toting steno-curious up and running as quickly as possible.
What You Need
- An Ergodox — if you do not have one already, buy one or wait for the next kit to drop if you want to build one
- Quantum Mechanical Keyboard (QMK) Firmware — see my blog post Escape the defaults and Control your keyboard with QMK for a guide to set up an Ergodox with QMK from scratch.
- Plover — open source software that lets you use your keyboard as a steno machine (installation instructions)
A small note about Plover: if you open it, and it immediately crashes without any kind of error message, you may need to check your operating system-level keyboard input source. If you use Google IME or a symbolic language like Japanese or Korean, you will probably “have to change to a QWERTY/US layout to use Plover for now”.
UPDATE 5 May 2021: Oryx now supports steno!
The Oryx online keyboard layout configuration tool by ZSA Technology Labs, makers of the Ergodox EZ, now supports configuring stenography keys!
This means that rather than get your hands dirty with code, you can use the nice web-based user interface to create your steno firmware.
Here is a layout I created using Oryx based on the one described in this blog post:
Feel free to take whatever you would like from it, or use it as a base to build out your own configuration!
If you are interested in coding up your own layout or getting in to some technical details, then definitely read on. Otherwise, you can probably skim the rest of this post, and only focus on the sections that involve configuring the Plover application itself.
UPDATE 21 July 2021: ZSA Guest Blog Post
Following on from ZSA supporting stenography in Oryx, I wrote a guest blog post for the ZSA blog on how to use it, and get Plover up and running:
Stenography with ZSA Keyboards: A Tutorial
Check it out if you are a steno-curious ZSA keyboard owner!
Now, back to the original post…
Initial Setup
For this post, we will use the QMK default Ergodox EZ keymap as a base, and make changes to it to add functionality for stenography. Feel free to follow along as-is, or make appropriate changes to your own custom keymaps. You can also see the finished layouts in this post’s companion keymaps on my QMK example keymaps Github repository:
(These keymap names will make more sense as you read through the post).
After installing the build tools for your operating system, make a clone of the QMK Firmware repository from Github if you do not have one already. Then, create a copy of the default Ergodox EZ keymaps directory into a new directory that we will call default_steno:
git clone git@github.com:qmk/qmk_firmware.git
cd qmk_firmware
cp -r keyboards/ergodox_ez/keymaps/default keyboards/ergodox_ez/keymaps/default_steno
If you have had a look through the list of provided QMK Ergodox keymaps, you may have seen that there is already a steno configuration provided, so why not just use that? Why go to the trouble of creating another layout? Well…
- The provided layout does not take advantage of QMK’s built-in support for stenography (which we will go over later), and instead re-implements steno functionality from scratch using custom binary key codes and custom functions
- The codes would seem to only work with the TX Bolt steno protocol (which, at least for me, resulted in incorrect key press processing, but more about that later as well…)
UPDATE 28 Apr 2019: The issue with TX Bolt is now fixed, and the most recent QMK Ergodox EZ steno configuration does now use QMK’s built-in support for stenography. I may be biased, but I think the rest of this post still has value, with the added benefit of now having less configuration to do if you decide to adapt QMK’s current Ergodox steno configuration for your own needs.
N-Key Rollover
Before adding a new keyboard layout to our keymap, the first thing we will need to do is ensure that we have N-Key Rollover (NKRO) enabled.
Stenography involves hitting multiple keys at once in a “chord”-like fashion. Therefore, we need to make sure that all of these key presses are detected by the Ergodox so they can be sent to the computer; keyboards typically detect up to 6 simultaneous key presses (aka “6KRO”), so the “n” in NKRO essentially stands for “as many keys as you like”.
The easiest way to confirm whether you have NKRO enabled is to perform Plover’s Keyboard Ghosting Test. In the Plover in-browser steno demo, if you find that only 6 keys light up on screen when you press the ASDFJKL; keys all at once, then you currently do not have NKRO enabled.
Luckily, the QMK Ergodox firmware has a built-in shortcut that can turn this on for you: hold down Left-Shift + Right-Shift + N. Now, try the steno demo again and you should see 8 keys light up on screen.
Having to turn NKRO on again manually every time you re-flash Ergodox firmware is going to get tiresome and potentially confusing, so let’s create some files to tell the firmware to enable it by default.
qmk_firmware/keyboards/ergodox_ez/keymaps/default_steno/rules.mk
FORCE_NKRO = yes
qmk_firmware/keyboards/ergodox_ez/keymaps/default_steno/config.h
#include "../../config.h"

#define FORCE_NKRO
You may be wondering why we need a config.h file since rules.mk already has a rule that says to force NKRO to be on. The best explanation I could find is that NKRO is, apparently, “disabled by default because some bioses aren’t compatible with NKRO”. So, I would just say to accept it, smile and nod, and just know that if you make these changes and then re-flash your firmware (see the video on the Ergodox EZ Graphical Configurator Page for how to do that), you should see that NKRO is now on without having to manually enable it.
New Steno QWERTY layer
The QMK default Ergodox EZ keymap has three layers: a base layer, a layer for symbols, and a layer for media keys (for our purposes, we can safely ignore the symbol and media keys layers). We cannot use the base QWERTY layer as-is for stenography: we need to move some keys around, and some keys we will not use. So, let’s add a new stripped-down QWERTY-like layer based on the QWERTY-to-steno mapping that Plover is expecting, which we will call STEN.
We will then (arbitrarily) assign the top right-most key on the left hand of the BASE layer to be the toggle to turn the STEN layer on and off, using QMK’s TG(layer) function:
qmk_firmware/keyboards/ergodox_ez/keymaps/default_steno/keymap.c
// ...
#define BASE 0 // default layer
#define SYMB 1 // symbols
#define MDIA 2 // media keys
#define STEN 3 // Stenography

// Helper to make keymaps a bit easier to read at a glance
#define _x_ KC_NO
#define ___ KC_TRNS

// ...
const uint16_t PROGMEM keymaps[][MATRIX_ROWS][MATRIX_COLS] = {
/* Keymap 0: Basic layer
 *
 * ,--------------------------------------------------. ...
 * |   =    |   1  |   2  |   3  |   4  |   5  | STEN | ...
 * |--------+------+------+------+------+-------------| ...
 * ...
 */
[BASE] = LAYOUT_ergodox(  // layer 0 : default
  // left hand
  KC_EQL, KC_1, KC_2, KC_3, KC_4, KC_5, TG(STEN),
  // ...
),
// ...
[SYMB] = LAYOUT_ergodox(
  // ...
),
// ...
[MDIA] = LAYOUT_ergodox(
  // ...
),
/* Keymap 3: Modified QWERTY for Stenography
 *
 * ,--------------------------------------------------.  ,--------------------------------------------------.
 * |   [x]  |   1  |   2  |   3  |   4  |   5  |      |  |  [x] |   6  |   7  |   8  |   9  |   0  |  [x]   |
 * |--------+------+------+------+------+------+------|  |------+------+------+------+------+------+--------|
 * |   [x]  |   Q  |   W  |   E  |   R  |   T  |      |  |      |   Y  |   U  |   I  |   O  |   P  |   [    |
 * |--------+------+------+------+------+------|  [x] |  |  [x] |------+------+------+------+------+--------|
 * |   [x]  |   A  |   S  |   D  |   F  |   G  |------|  |------|   H  |   J  |   K  |   L  |   ;  |   '    |
 * |--------+------+------+------+------+------|      |  |      |------+------+------+------+------+--------|
 * |   [x]  |  [x] |  [x] |  [x] |  [x] |      |  [x] |  |  [x] |  [x] |  [x] |  [x] |  [x] |  [x] |  [x]   |
 * `--------+------+------+------+------+-------------'  `-------------+------+------+------+------+--------'
 *   | [x]  |  [x] |  [x] |  [x] |  [x] |                              |  [x] |  [x] |  [x] |  [x] |  [x] |
 *   `----------------------------------'                              `----------------------------------'
 *                                      ,-------------.  ,-------------.
 *                                      |  [x] |  [x] |  |  [x] |  [x] |
 *                               ,------|------|------|  |------+------+------.
 *                               |      |      |  [x] |  |  [x] |      |      |
 *                               |  C   |   V  |------|  |------|   N  |   M  |
 *                               |      |      |  [x] |  |  [x] |      |      |
 *                               `--------------------'  `--------------------'
 */
[STEN] = LAYOUT_ergodox(  // layer 3 : Modified QWERTY for Stenography
  // left hand
  _x_, KC_1, KC_2, KC_3, KC_4, KC_5, ___,
  _x_, KC_Q, KC_W, KC_E, KC_R, KC_T, _x_,
  _x_, KC_A, KC_S, KC_D, KC_F, KC_G,
  _x_, _x_,  _x_,  _x_,  _x_,  _x_,  _x_,
  _x_, _x_,  _x_,  _x_,  _x_,
                               _x_,  _x_,
                                     _x_,
                         KC_C, KC_V, _x_,
  // right hand
  _x_, KC_6, KC_7, KC_8, KC_9, KC_0,    _x_,
  _x_, KC_Y, KC_U, KC_I, KC_O, KC_P,    KC_LBRC,
       KC_H, KC_J, KC_K, KC_L, KC_SCLN, KC_QUOT,
  _x_, _x_,  _x_,  _x_,  _x_,  _x_,     _x_,
             _x_,  _x_,  _x_,  _x_,     _x_,
  _x_, _x_,
  _x_,
  _x_, KC_N, KC_M
)
};
// ...
Note the uses of
_x_and___here:
_x_specifically indicates that pressing the key results in a NOOP: the keystroke is ignored___is a “transparent” mapping, which in this case for the toggle key, will “fall back” to theTG(STEN)function on theBASElayer. This is really just a convenience so that we don’t need to specifyTG(STEN)again on theSTENlayerMore information about these two mappings in the QMK Special Keys documentation.
Next, generate the firmware from the qmk_firmware directory root path:
make ergodox_ez:default_steno
This should generate an ergodox_ez_default_steno.hex file, which you can then use to flash your Ergodox firmware. If you get any build issues, check what you have against my example code for this layer.
Once you’ve flashed your keyboard firmware, open up your favourite text editor, press the top right-most key on the left hand to toggle the steno layer, and type some text to confirm that all is working as expected (the thumb clusters using the CVNM keys are a good litmus test).
Now, there is no steno magic happening quite yet, since our keystrokes are being interpreted and output as-is by the computer. What we need now is something to receive our keystrokes, and then translate them what a steno machine would output.
Enter Plover
Open up the Plover application, select the “Enable” radio button, and try typing again.
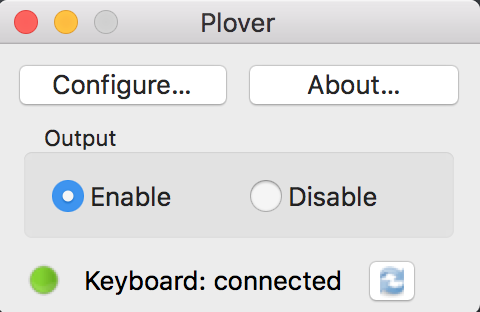
The output should be completely different than before, which would indicate that everything is working: we are typing in steno! So, what I would recommend doing now is opening up Lesson 1 of the Learn Plover! free text book, try typing some of the one-syllable steno words, and generally have a play around.
Awesome! Are we done now…?
From a keyboard configuration and typing standpoint, we have pretty much achieved our objectives. In order to get back to our base QWERTY layout, we will need to:
- Click the “Disable” radio button on the Plover window so that our keystrokes do not get translated into steno output any more
- Press the key to toggle the
STENlayer off and get back to ourBASElayer
If you feel comfortable with this setup, then you are all done!
First-world Steno Problems
For me though, even after a few minutes of using this setup, I ended up being annoyed about having to turn steno functionality “off” at both the hardware and software level. When I toggle my STEN layer off, I want the computer/Plover to consider me out of steno-mode and back into vanilla-keyboard-mode: I do not want to have to remember to manually disable Plover.
So, what can be done about this? You could do something similar to what Waleed Khan did, and create a macro in your keyboard layout that toggles Plover when the steno layer is toggled, bringing hardware and software in sync with each other. This is a very valid option, though I wondered if I could somehow have Plover enabled all the time, but just have it ignore any non-steno input.
As it turns out, we can do exactly this by doing the following:
- Have QMK speak to Plover using a steno machine protocol that Plover understands
- Have Plover listen only for input in that protocol, ignoring non-steno keyboard chatter
Since our STEN layer currently sends standard key presses to Plover, we will have to completely change the layout to use QMK steno keycodes instead of character key presses. So, back to the text editor!
Steno Layer: Take 2
Open up the keymap file and change the code so that it looks like this:
qmk_firmware/keyboards/ergodox_ez/keymaps/default_steno/keymap.c
// ...
#include "keymap_steno.h"

#define BASE 0 // default layer
#define SYMB 1 // symbols
#define MDIA 2 // media keys
#define STEN 3 // Stenography

// Helper to make keymaps a bit easier to read at a glance
#define _x_ KC_NO
#define ___ KC_TRNS

// ...
const uint16_t PROGMEM keymaps[][MATRIX_ROWS][MATRIX_COLS] = {
/* Keymap 0: Basic layer
 *
 * ,--------------------------------------------------. ...
 * |   =    |   1  |   2  |   3  |   4  |   5  | STEN | ...
 * |--------+------+------+------+------+-------------| ...
 * ...
 */
[BASE] = LAYOUT_ergodox(  // layer 0 : default
  // left hand
  KC_EQL, KC_1, KC_2, KC_3, KC_4, KC_5, TG(STEN),
  // ...
),
// ...
[SYMB] = LAYOUT_ergodox(
  // ...
),
// ...
[MDIA] = LAYOUT_ergodox(
  // ...
),
/* Keymap 3: Stenography
 *
 * ,--------------------------------------------------.           ,--------------------------------------------------.
 * |   [x]  |   #  |   #  |   #  |   #  |   #  |      |           |  [x] |   #  |   #  |   #  |   #  |  #   |   #    |
 * |--------+------+------+------+------+------+------|           |------+------+------+------+------+------+--------|
 * |   [x]  |   S  |   T  |   P  |   H  |   *  |      |           |      |   *  |   F  |   P  |   L  |   T  |   D    |
 * |--------+------+------+------+------+------|  [x] |           |  [x] |------+------+------+------+------+--------|
 * |   [x]  |   S  |   K  |   W  |   R  |   *  |------|           |------|   *  |   R  |   B  |   G  |   S  |   Z    |
 * |--------+------+------+------+------+------|      |           |      |------+------+------+------+------+--------|
 * |   [x]  |  [x] |  [x] |  [x] |  [x] |  [x] |  [x] |           |  [x] |  [x] |  [x] |  [x] |  [x] |  [x] |  [x]   |
 * `--------+------+------+------+------+-------------'           `-------------+------+------+------+------+--------'
 *   | [x]  |  [x] |  [x] |  [x] |  [x] |                                       |  [x] |  [x] |  [x] |  [x] |  [x] |
 *   `----------------------------------'                                       `----------------------------------'
 *                                        ,-------------.       ,-------------.
 *                                        |  [x] |  [x] |       |  [x] |  [x] |
 *                                 ,------|------|------|       |------+------+------.
 *                                 |      |      |  [x] |       |  [x] |      |      |
 *                                 |  A   |   O  |------|       |------|   E  |   U  |
 *                                 |      |      |  [x] |       |  [x] |      |      |
 *                                 `--------------------'       `--------------------'
 */
[STEN] = LAYOUT_ergodox(  // layer 3 : Stenography
    // left hand
    _x_, STN_N1, STN_N2, STN_N3, STN_N4, STN_N5,  ___,
    _x_, STN_S1, STN_TL, STN_PL, STN_HL, STN_ST1, _x_,
    _x_, STN_S2, STN_KL, STN_WL, STN_RL, STN_ST2,
    _x_, _x_,    _x_,    _x_,    _x_,    _x_,     _x_,
    _x_, _x_,    _x_,    _x_,    _x_,
                                         _x_,     _x_,
                                                  _x_,
                                 STN_A,  STN_O,   _x_,
  // right hand
  _x_, STN_N6,  STN_N7, STN_N8, STN_N9, STN_NA, STN_NB,
  _x_, STN_ST3, STN_FR, STN_PR, STN_LR, STN_TR, STN_DR,
       STN_ST4, STN_RR, STN_BR, STN_GR, STN_SR, STN_ZR,
  _x_, _x_,     _x_,    _x_,    _x_,    _x_,    _x_,
                _x_,    _x_,    _x_,    _x_,    _x_,
  _x_, _x_,
  _x_,
  _x_, STN_E,   STN_U
)
};

// ...

// Runs just one time when the keyboard initializes.
void matrix_init_user(void) {
  // ...
  steno_set_mode(STENO_MODE_GEMINI);
};
Some notes about these changes:
-
#include "keymap_steno.h"at the top of the file enables us to use QMK steno-specific functionality like keycodes and protocols - The keymap now looks more like a steno machine keymap
- The
steno_set_mode(STENO_MODE_GEMINI)function sets the steno protocol to be GeminiPR when the keyboard initialises. I initially tried to use TX Bolt (STENO_MODE_BOLT) for the parameter, as QMK apparently speaks that protocol by default, but I found that key presses did not come in (or were not processed) properly, while GeminiPR worked as expected (UPDATE 28 Apr 2019: This issue has been fixed)
We will also need to update the rules file due to a few quirks of using steno-specific functionality in QMK:
qmk_firmware/keyboards/ergodox_ez/keymaps/default_steno/rules.mk
STENO_ENABLE = yes
VIRTSER_ENABLE = yes
FORCE_NKRO = yes
MOUSEKEY_ENABLE = no
Some notes about these changes:
- As you can see, steno mode needs to be specifically enabled in our rules (
STENO_ENABLE = yes), and if steno is enabled, then the USB serial driver for the firmware needs to be enabled as well (VIRTSER_ENABLE = yes) or the keymap will not compile - The cost of enabling steno is that it takes up 3 virtual serial ports that would normally be used by mouse-related functionality in our
MDIAlayer, so we have to explicitly disable mouse keys (MOUSEKEY_ENABLE = no). If you make a lot of use of mouse movements and clicks via your keyboard, you may want to consider going back and using the modified QWERTY steno keymap. For me personally, I can live without using my keyboard as a mouse.
UPDATE 1 Jun 2021
I recently found out that this limitation with the virtual serial ports would seem to have been removed, or at least mitigated. It is now possible to have steno and mouse/media keys use “shared endpoints” (essentially sharing their virtual serial ports) with the use of a
KEYBOARD_SHARED_EP = yesdirective. So, therules.mkfile can be changed to:
qmk_firmware/keyboards/ergodox_ez/keymaps/default_steno/rules.mkSTENO_ENABLE = yes VIRTSER_ENABLE = yes FORCE_NKRO = yes MOUSEKEY_ENABLE = yes KEYBOARD_SHARED_EP = yesSee QMK’s USB Endpoint Limitations documentation for details.
Now, let’s re-generate the ergodox_ez_default_steno.hex and flash our firmware:
make ergodox_ez:default_steno
If you get any build issues, check what you have against my example code for this layer.
Configure Plover for GeminiPR
Now that we have got QMK speaking in GeminiPR protocol, we need to get Plover configured to listen for it.
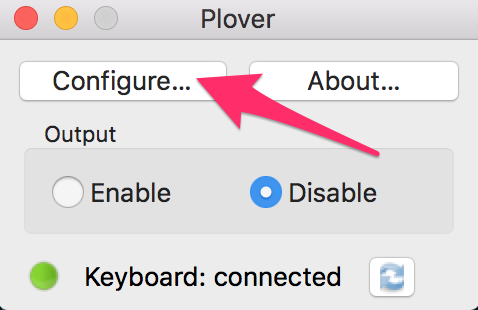
- Click the “Configure…” button in the Plover window
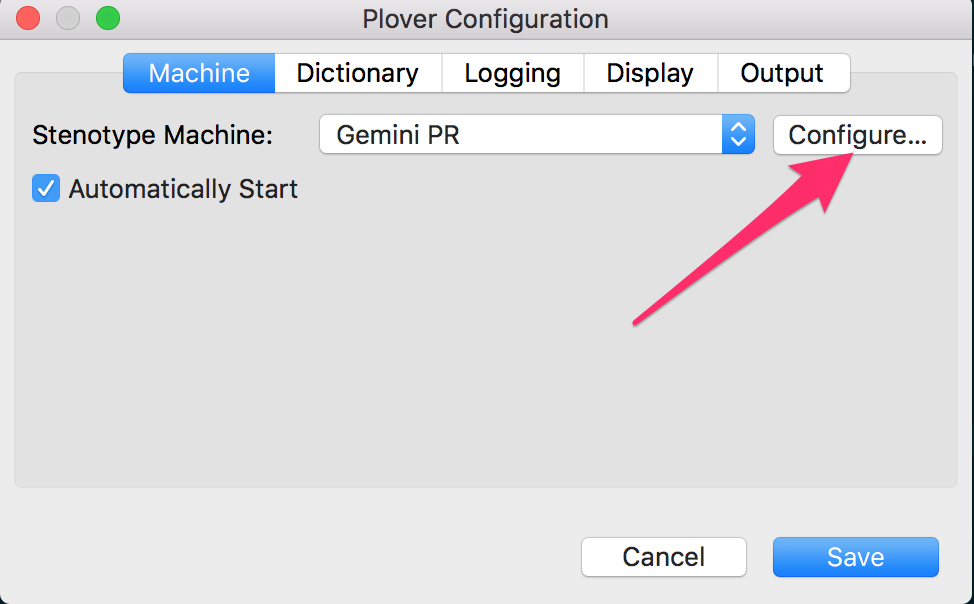
- Select “Gemini PR” from the “Stenotype Machine” dropdown list
- Click the “Configure…” button next to the dropdown list
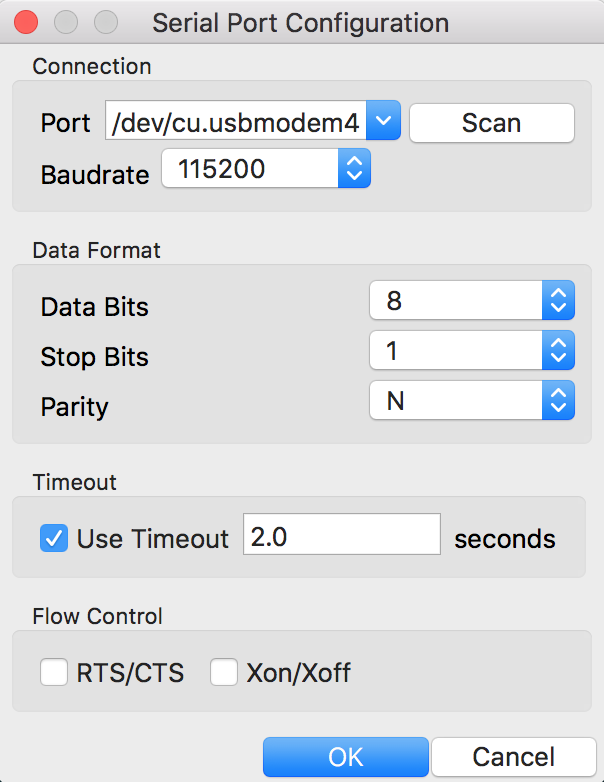
- Select a port from the “Port” dropdown. The device name may not exactly match what you see in this screen shot. If you see an empty “Port” dropdown list, click the “Scan” button to populate it
- Change the “Baudrate” dropdown value to 115200 (since QMK can handle that speed)
- Click “OK”
- Click “Save” on the “Plover Configuration” window
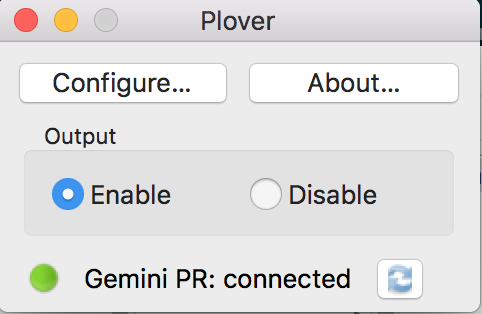
- Click “Enable” on the Plover window and you should get a message saying “Gemini PR: connected”
You should now be able to just leave Plover enabled: any keystrokes you make when you switch your Ergodox layer over to STEN will be translated to steno, and Plover will ignore keystrokes made when using any other layer.
One Final Hardware Tweak
The key caps on my Ergodox are DCS profile, which means that they are sculptured differently per row on the keyboard, leading to ergonomically-sized gaps between each key row.
Steno keys are meant to be close together since chording will require a single finger to press multiple keys. In order to get the keys closer together, I turned the QWERT and YUIOP[ keys upside down, so they would lean closer to the keys in the layer below, and changed the direction of the large thumb cluster keys so they would face each other.
At this stage, I am not sure how much of an effect this will have, but I think this is the best I can do without buying a potentially more appropriate key cap set.
The Journey Begins
All this effort put towards getting a perfect QMK steno set up has taken time away from actually getting better at steno, so I’d better get back to that. (Just for completeness’ sake, though, here are my current keymaps that I will be using moving forward)
As of this writing, I am currently only at 12 WPM after completing Lesson 1 of Learn Plover!, so when it comes to stenography, I am very much a beginner student with a long road ahead. So, if there are any glaring mistakes or omissions in this post, please let me know in the comments.
UPDATE 8 Nov 2018
After working my way through Learn Plover!, I have come to the conclusion that I set the steno keys to be one row too high, and that changing keycaps made a big difference.
Move steno keys down a row
Complex key chords for words that, say, require a right thumb press for EU, as well as a stretched right little finger press for DZ, caused a bit of discomfort in my fingers and wrists as I had to awkwardly contort my hand to press all the keys.
So, I moved all the steno keys down a single row on the keyboard, and now all is well again, even with more complex chords. So, in the context of the default_steno keymap, the keymap will now look like this:
qmk_firmware/keyboards/ergodox_ez/keymaps/default_steno/keymap.c
// ...
#include "keymap_steno.h"

#define BASE 0 // default layer
#define SYMB 1 // symbols
#define MDIA 2 // media keys
#define STEN 3 // Stenography

// Helper to make keymaps a bit easier to read at a glance
#define _x_ KC_NO
#define ___ KC_TRNS

// ...
const uint16_t PROGMEM keymaps[][MATRIX_ROWS][MATRIX_COLS] = {
/* Keymap 0: Basic layer
 *
 * ,--------------------------------------------------. ...
 * |   =    |   1  |   2  |   3  |   4  |   5  | STEN | ...
 * |--------+------+------+------+------+-------------| ...
 * ...
 */
[BASE] = LAYOUT_ergodox(  // layer 0 : default
  // left hand
  KC_EQL, KC_1, KC_2, KC_3, KC_4, KC_5, TG(STEN),
  // ...
),
// ...
[SYMB] = LAYOUT_ergodox(
  // ...
),
// ...
[MDIA] = LAYOUT_ergodox(
  // ...
),
/* Keymap 3: Stenography
 *
 * ,--------------------------------------------------.           ,--------------------------------------------------.
 * |   [x]  |  [x] |  [x] |  [x] |  [x] |  [x] |      |           |  [x] |  [x] |  [x] |  [x] |  [x] |  [x] |  [x]   |
 * |--------+------+------+------+------+------+------|           |------+------+------+------+------+------+--------|
 * |   [x]  |   #  |   #  |   #  |   #  |   #  |      |           |      |   #  |   #  |   #  |   #  |   #  |   #    |
 * |--------+------+------+------+------+------|  [x] |           |  [x] |------+------+------+------+------+--------|
 * |   [x]  |   S  |   T  |   P  |   H  |   *  |------|           |------|   *  |   F  |   P  |   L  |   T  |   D    |
 * |--------+------+------+------+------+------|      |           |      |------+------+------+------+------+--------|
 * |   [x]  |   S  |   K  |   W  |   R  |   *  |  [x] |           |  [x] |   *  |   R  |   B  |   G  |   S  |   Z    |
 * `--------+------+------+------+------+-------------'           `-------------+------+------+------+------+--------'
 *   | [x]  |  [x] |  [x] |  [x] |  [x] |                                       |  [x] |  [x] |  [x] |  [x] |  [x] |
 *   `----------------------------------'                                       `----------------------------------'
 *                                        ,-------------.       ,-------------.
 *                                        |  [x] |  [x] |       |  [x] |  [x] |
 *                                 ,------|------|------|       |------+------+------.
 *                                 |      |      |  [x] |       |  [x] |      |      |
 *                                 |  A   |   O  |------|       |------|   E  |   U  |
 *                                 |      |      |  [x] |       |  [x] |      |      |
 *                                 `--------------------'       `--------------------'
 */
[STEN] = LAYOUT_ergodox(  // layer 3 : Stenography
    // left hand
    _x_, _x_,    _x_,    _x_,    _x_,    _x_,     ___,
    _x_, STN_N1, STN_N2, STN_N3, STN_N4, STN_N5,  _x_,
    _x_, STN_S1, STN_TL, STN_PL, STN_HL, STN_ST1,
    _x_, STN_S2, STN_KL, STN_WL, STN_RL, STN_ST2, _x_,
    _x_, _x_,    _x_,    _x_,    _x_,
                                         _x_,     _x_,
                                                  _x_,
                                 STN_A,  STN_O,   _x_,
  // right hand
  _x_, _x_,     _x_,    _x_,    _x_,    _x_,    _x_,
  _x_, STN_N6,  STN_N7, STN_N8, STN_N9, STN_NA, STN_NB,
  _x_, STN_ST3, STN_FR, STN_PR, STN_LR, STN_TR, STN_DR,
       STN_ST4, STN_RR, STN_BR, STN_GR, STN_SR, STN_ZR,
                _x_,    _x_,    _x_,    _x_,    _x_,
  _x_, _x_,
  _x_,
  _x_, STN_E,   STN_U
)
};

// ...

// Runs just one time when the keyboard initializes.
void matrix_init_user(void) {
  // ...
  steno_set_mode(STENO_MODE_GEMINI);
};
I have updated the code on this post’s companion Github repo to reflect these changes, but kept the original “high” configuration in another directory for your reference. You can also see how I’ve incorporated this change in my current personal keymaps.
Use Steno-Appropriate Keycaps
Based on the Plover Keycap Recommendations, I picked up a set of G20 Blank Keysets and this has made chording much easier.
Switching the direction of my original DCS profile keys helped a little bit, but the flat and wide profile of the G20s makes pressing two keys with the same finger significantly less awkward. So, I can definitely recommend picking up a set if you are going to make a serious attempt at learning steno on an Ergodox, or really any mechanical keyboard.
For Ergodox users, I would recommend picking up both the G20 Ergodox Base and Ergodox Modifier sets that PMK offers. I initially only ordered a modifier set, thinking that I would be fine with having a mix of profiles on the board, but the issues with that I found were:
- Having a board with multiple types of keycap profiles is kind of awkward when switching back to QWERTY typing
- The Ergodox Modifier set only contains enough keys to cover a base steno layout, and not the steno number key
#row (this may not necessarily be a deal breaker for you if you plan on just using the QWERTY number row) - The Ergodox Modifier set does not come with any homing keys (keys with a bar or dot on them to signify to your index finger that you are on home row). My index fingers naturally seek out homing keys, and I could not get over not having them, which is partly what prompted me to pick up the Ergodox Base set (if you want the homing bars/dots but don’t want the base set, you have the option of just buying a set of those keys separately)
UPDATE 8 Jun 2020
Use Steno-Appropriate Switches (if possible)
A few months ago from this writing, I had occasion to pick up a new Ergodox EZ. While I have played with a variety of keyboard switches on other people’s keyboards, I have only ever used Cherry MX Browns and Gateron Browns on a regular basis. So, I decided to look into more steno-friendly keyswitch types for the new board.
Based on advice in the Plover keyswitch guide, I looked at the Ergodox EZ keyswitches page to see which ones provide a “light actuation force on a linear switch”. Judging by the page comparison charts, Kailh Speed Silver switches seemed the most appropriate, so that’s what I got.
After practising with Kailh Silvers, I can definitely recommend them over Cherry/Gateron Browns for stenography. Chording is noticeably easier due to the lighter touch, and I have found that my hands are a bit less fatigued after a practice session.
However, I would probably not recommend buying a brand new Ergodox specifically to get new keyswitches, especially if you are still a learner and your current board works fine. If you have a newer Ergodox that has changeable switches, then you have the option to just buy some Kailh Speed Silvers (or any of the other switches the Plover guide mentions).
If you are like me, though, and your older board needs replacing, or you are considering buying/building your first Ergodox, then the path I took is open to you.
Number “Bar” versus Button
I have found chording numbers quite challenging, and have wondered if there was perhaps an easier way to stroke them.
The QMK Ergodox EZ steno configuration, as of this writing, re-creates a stenography machine number bar over 11 separate keys. However, looking at the layout of a modern keyboard made specifically for stenography, the Georgi (QMK layout), it uses a single number key on each of its thumb clusters, presumably to be used in the same vein as the asterisk key.
It makes a lot of sense to me to palm off number duty to your thumbs in order to keep your other fingers from ever moving away from steno home row, so I have modified my own layout to have number keys in two extra places on the Ergodox:
- under the
Rkeys on both halves - above the
OandEkeys
Applied to the layout used above, it would look like the following, using the STN_NC keycode for all the keys since it has not been used yet:
qmk_firmware/keyboards/ergodox_ez/keymaps/default_steno/keymap.c
// ...
/* Keymap 3: Stenography
 *
 * ,--------------------------------------------------.           ,--------------------------------------------------.
 * |   [x]  |  [x] |  [x] |  [x] |  [x] |  [x] |      |           |  [x] |  [x] |  [x] |  [x] |  [x] |  [x] |  [x]   |
 * |--------+------+------+------+------+------+------|           |------+------+------+------+------+------+--------|
 * |   [x]  |   #  |   #  |   #  |   #  |   #  |      |           |      |   #  |   #  |   #  |   #  |   #  |   #    |
 * |--------+------+------+------+------+------|  [x] |           |  [x] |------+------+------+------+------+--------|
 * |   [x]  |   S  |   T  |   P  |   H  |   *  |------|           |------|   *  |   F  |   P  |   L  |   T  |   D    |
 * |--------+------+------+------+------+------|      |           |      |------+------+------+------+------+--------|
 * |   [x]  |   S  |   K  |   W  |   R  |   *  |  [x] |           |  [x] |   *  |   R  |   B  |   G  |   S  |   Z    |
 * `--------+------+------+------+------+-------------'           `-------------+------+------+------+------+--------'
 *   | [x]  |  [x] |  [x] |  [x] |   #  |                                       |   #  |  [x] |  [x] |  [x] |  [x] |
 *   `----------------------------------'                                       `----------------------------------'
 *                                        ,-------------.       ,-------------.
 *                                        |   #  |  [x] |       |  [x] |   #  |
 *                                 ,------|------|------|       |------+------+------.
 *                                 |      |      |  [x] |       |  [x] |      |      |
 *                                 |  A   |   O  |------|       |------|   E  |   U  |
 *                                 |      |      |  [x] |       |  [x] |      |      |
 *                                 `--------------------'       `--------------------'
 */
[STEN] = LAYOUT_ergodox(  // layer 3 : Stenography
    // left hand
    _x_, _x_,    _x_,    _x_,    _x_,    _x_,     ___,
    _x_, STN_N1, STN_N2, STN_N3, STN_N4, STN_N5,  _x_,
    _x_, STN_S1, STN_TL, STN_PL, STN_HL, STN_ST1,
    _x_, STN_S2, STN_KL, STN_WL, STN_RL, STN_ST2, _x_,
    _x_, _x_,    _x_,    _x_,    STN_NC,
                                         STN_NC,  _x_,
                                                  _x_,
                                 STN_A,  STN_O,   _x_,
  // right hand
  _x_, _x_,     _x_,    _x_,    _x_,    _x_,    _x_,
  _x_, STN_N6,  STN_N7, STN_N8, STN_N9, STN_NA, STN_NB,
  _x_, STN_ST3, STN_FR, STN_PR, STN_LR, STN_TR, STN_DR,
       STN_ST4, STN_RR, STN_BR, STN_GR, STN_SR, STN_ZR,
                STN_NC, _x_,    _x_,    _x_,    _x_,
  _x_, STN_NC,
  _x_,
  _x_, STN_E,   STN_U
)
// ...
I am not sure which of these thumb-based number keys I will end up using yet (if any), so I am planning on letting my hands decide what feels right. See my personal QMK keymap for more details and code to copy if you want to try this layout as well.


Leave a comment